
The toilet tank you see is more prone to cracks and damage than any other part. That is because the tank contains all the function parts for flushing. But how do you know if there is an issue with the toilet tank?
Well, the easiest way to know is if you notice water leaking from the tank or flooding your toilet floor. But do not panic if you find leaks or cracks on the tank because this problem is fixable.
There are many types of glue to fix toilet cracks and damages without much hassle. And today, I will talk about the best epoxy for toilet tank repair and share the buyer’s guide for purchasing the suitable glue. You will also find a guideline to find cracks on the toilet tank and repair them.
In A Hurry? The Winner After 3 Days Of Research: XUDOAI Moldable Epoxy Glue
Among my three top picks in this article, the XUDOAI Moldable Epoxy Glue is the acclaimed winner of the best epoxy for toilet tank repair.
Why Is It Better?
- Suitable for use on multiple surfaces
- Best epoxy glue for money
- Easy to mix and apply
- Heals quickly
- Do not change the material colour when it dries
- Can last a year if stored correctly
Choosing The Best Epoxy For Toilet Tank Repair
Epoxy glues are strong, powerful, durable, and suitable for fixing various cracks and breaks. But are they all suitable for fixing toilet tanks? Probably not. The glues suitable for toilet tank repair come with particular features and qualities, such as good adhesion, heat resistance, quick-dry and cure time, etc.
If you know what you need to look for to choose the suitable epoxy glue, your money will be worth spending. So here is a buying guide that will help you figure out which one is the best epoxy for toilet tank repair.
Type Of Damage
The first thing to consider before getting glue is to know what you are dealing with. The most common toilet tank issue requires glue to repair cracks.
It can either be a hairline crack or a broken edge. Though hairline cracks do not require epoxy glue unless you want to use them conveniently, larger cracks or broken damages are challenging to fix without epoxy glue.
Ease Of Application
The lesser hassle you go through while applying the glue, the better. You do not want to spend a long time preparing and repairing the damage, right? So the best thing to do is look for epoxy glue that comes with relatively less complicated instructions.
Some glues come with applicators, or the container comes with a design that works as an applicator. If the glue has such a feature, it is a time-saving gem.
Adhesion
Will the glue fix the damage or hold the cracks together? The glue must have a high adhesive strength to ensure the crack does not reappear.
Epoxy glues are already known to do such jobs without any problem. However, if you purchase poor-quality glue or glue with low adhesion, it will soon cause trouble.
Resistance
The glue should come with a high resistance capacity to heat and water. Since it is a toilet tank, it will be wet all the time. Even if the crack is on the outside area of the tank, it still has the chance to get wet often.
And temperature change is also a reason why the glue might come off. That is why read the product description properly to check if the glue is water and heat-resistant.
Dry And Cure Time
The dry and cure time matters a lot because you do not want to spend days waiting before you can use the toilet or the tank. Most epoxy glues dry pretty quickly, but curing can take longer. Read the instructions properly to know if the glue will ensure maximum efficiency and effectiveness.
Easy To Clean
The problem with glues that dry too fast is that if you make a mistake during the application, removing the glue will be very challenging. The same can be said if the glue gets onto unwanted areas and needs cleaning.
Glue containers with application nozzles might not create the issue. However, it is best to read the instructions and product details to know how fast the glue dries. You need to ensure purchasing the one that dries neither too quickly nor too slowly.
Non-Toxic And Colourless
The glue should be free of toxic ingredients as they are not safe to use. Most glues use some chemicals to increase their effectiveness. But it is best to try avoiding them because toxic glues can cause various skin issues, and the fume is also harmful. Moreover, choose colourless glue to blend with the toilet tank colour.
Price
Epoxy glues are not very expensive, or something one cannot afford. But it is essential to ensure you are paying a reasonable price for what you buy. However, some epoxy glues are more expensive than others because they offer better quality and come from a renowned brand.
Types Of Glue For Toilet Tank Repair

The Toilet tank cannot be fixed with any type of glue. Depending on the types of glues, one can use the following glues to fix cracks or damages.
Super Glue
Super glues are one of the most commonly used glue and are known for having strong bonding quality. It is suitable for glueing together two broken surface pieces or something delicate. Besides, it is a suitable glue to fix the toilet tank if you want to get the job done quickly.
Super glues work on various surfaces, including porcelain and ceramics. That is why it is the first choice for many users when it comes to DIY fixing projects.
Epoxy Glue
Epoxy glues are as well-performing as super clues and also suitable for various surfaces. However, this type of glue is more recommended to fill the gaps in the damaged areas and provide a stronger bond. Epoxy glues come in two parts: the resin or glue and the hardener or healing agent.
Some epoxy glues come with separate ingredient packs that require specific instructions to mix them. Others come in a single container with mixed ingredients, making the glue application less complicated.
Polyurethane
If the damage is too severe, polyurethane glue can be an excellent solution as this glue tends to be robust and powerful. The polyurethane glue is made of polymers of carbon chains chemical reaction. It has a powerful adhesive bonding strength and resists heat and water like epoxy glue.
The downside of this glue is that it contains chemicals and some toxic ingredients. And as a result, it is mandatory to take precautions when handling this glue.
What Causes Toilet Tanks To Crack?
Cracks and damages to toilet tanks are inevitable. Since it is made of ceramic or porcelain, it is not unusual for the tanks or the toilet bowls to get cracks or broken areas. But what exactly can cause these damages? Here are a few reasons why your toilet tank has a crack on it.
Manufacturing Flaw
Though it happens on rare occasions, the crack on the tank you see could be a manufacturing flaw. The tank goes through various processes and gets handled by many people, and careless handling results in cracks in the tank.
Poor Transportation And Handling
When you purchase the tank and transport it to your home, it can crack on the way because of the poor transportation system. It can also crack if it is not handled carefully while loading and unloading or setting up.
Crash With Heavy Object
The toilet tank or bowl is usually made of ceramic. And ceramic can break if it is hit with a heavy force or by a heavy object. If something heavy falls on the tank, it can cause a hairline crack, expanding over time.
Long Term Use
Toilet bowls and tanks are not something you change every few years. The best thing about them is that people can use them for decades if maintained correctly. But as time passes, the tanks go through various things and become more and more fragile. As a result, cracks and other damages begin to show up gradually.
Accidental Lid Drop
All toilet tanks come with a ceramic or porcelain lid to cover the internal equipment. The lid is not exactly lightweight, making it essential to move it cautiously if taken off the tank. So in case, there is an accidental drop, it can be why there is a crack in the tank.
How To Find Cracks In The Toilet Tank

Not all cracks on the toilet tank can be visible. Some cracks, especially hairline ones, are a bit tricky to find, making it difficult to fix them. But there are two ways to find the cracks in the toilet tank, and here they are.
Cracks Under The Water Level
If there is a crack in the tank that is under the tank’s water level, it is a serious issue and requires fixing as soon as possible. Since the crack is under the water level, you will notice water leaking from the tank through the cracked area.
If not fixed in time, this crack will grow over time, making it more difficult and expensive to fix. If you cannot spot the leakage source in the tank area, try checking the area between the tank and the bowl.
Cracks Above The Water Level
If the crack is above the water level, it can be difficult to spot without seeing any leakage. However, such cracks are easier to spot in most cases as you do not need to look at the tank’s lower areas.
These types of cracks are not usually a major issue because they do not cause any leaks. But it is essential to keep an eye on it and monitor if the crack grows or expands over time.
Invisible Crack
These cracks are the trickiest ones to find. But knowing they exist in your toilet tank gives you an idea to look for the crack and find it. But how do you know there is an invisible crack in the toilet tank?
If there is a crack in the tank, you will notice that the tank is getting empty without using the flush system. The water will either leak on the floor or go down the flush system.
How To Repair Cracks In A Toilet Tank
Here is an easy step-by-step guide that you can follow to fix your toilet tank’s crack with epoxy glue.
Tools You Will Need
- Sponge/Towel
- Hairdryer
- Container/paper plate
- Putty knife/spreader
- Epoxy glue
- Safety gloves and equipment (if necessary)
Step 1: Turn Off The Water System
Though it is not mandatory, turning off the water can make the repair job more manageable and less hassle. If there is a leaking issue, you cannot work with the water coming out all the time. Besides, it will make the glue application more complicated and less effective.
So make sure to turn off the water system for your toilet tank. You can keep the other water lines of your hour turned on as they will not cause any issue here.
Step 2: Empty The Toilet Tank And Dry It
Now press the flush button to empty the toilet tank. Like I said already, you cannot work on a wet tank. So it has to be as dry as possible. You can use a sponge to clean the inside of the tank until there is no water left.
If the drying part seems time-consuming, you can use a hairdryer to make it quick. But be careful if you do so because it is not always wise to use electric items near a water source or on a wet floor. Use a dry towel or sponge to clean the surrounding areas of the cracked or broken part, so there is no dust or debris on it.
Step 3: Take Safety Measures
After drying the tank, you need to get ready to work on the epoxy glue. But it is advisable not to touch any such glues without safety precautions. You can wear a pair of latex gloves to avoid touching the glue accidentally.
If the area you are working in is stuffy, make sure it has enough light and a ventilation system. Epoxy glue usually does not contain any toxic chemical that releases fumes. So you can work with it without wearing any mask.
Step 4: Mix Epoxy Glue
Skip this part if you bought a mixed epoxy glue container with an application nozzle. But if you purchase a two-part epoxy glue, it will come with two different ingredients: the resin and the hardener.
Your job is to follow the instructions on the glue package and mix them. Take a container or a paper plate and pour the instructed amount of resin and hardener on it. Then use a putty knife or paper-knife to spread and mix the ingredients and prepare the epoxy.
Step 5: Apply The Glue
Epoxy that comes in a container with nozzles is simpler to apply as everything comes prepared. You only have to apply the glue over the crack or damage and fix it. However, if it is a two-part epoxy, you will require a putty knife or paper-knife to apply it over the damage.
Spread the glue evenly over the cracks to get covered properly or filled. If the damage contains broken tank pieces, apply the epoxy on one part and then put the broken parts on it. Apply more than one epoxy coating if necessary.
Step 6: Wait For The Glue To Dry
Manufacturers recommend waiting 24 hours or at least overnight to let the epoxy dry and cure entirely. If the glue does not cure before you use the tank or fill it with water, the moisture will soak the glue. So it is best to follow the instructions and wait until the recommended time passes.
Step 7: Final Touch-Ups
If you fix the crack from the exterior part of the tank and it is too visible, you can apply some paints that match the tank’s exterior colour. You can use masking tape over the repaired interior area of the tank to ensure the water stays away from the recently fixed damage.
Step 8: Turn On Water Line And Test
Once everything is done, it is time to check if you have done things right. Turn on the water supply line of the tank and let it fill. Then check if any leakage is visible or if water is still coming out. If not, congratulations to you for fixing the crack in the toilet tank.
Safety Tips
No matter how safe a glue claims to be, it is essential to take precautions while handling them. You can follow these safety tips to prevent any kind of hazard when preparing or applying glues.
Follow The Instructions
All glues come with instruction guides, especially epoxy glue since the glue and the hardener require mixing. As a user, your job is to read the instructions even before purchasing the glue and ensure you understand it well.
Proper Ventilation
If you are using glue with toxic chemicals or a strong odour, do not apply it when inside a narrow or stuffy area. Toxic glues can emit harmful fumes and be threatening to your respiratory system and health. So even if you are fixing the toilet tank with glue, make sure the area is well ventilated and will not cause suffocation.
Safety Wears
It is better to wear safety gloves when mixing epoxy glue or applying any glue. You would not want them on your skin as some glues can be very difficult to remove or cause other skin problems. And if you are handling toxic glues or the ones with a strong odour, you should wear protective glasses and a mask.
Rinse Well
Even if you wear protective equipment, you can still come in contact with the glue chemicals and other ingredients. So make sure to clean your hands with soap or handwash for at least a minute and then rinse them properly.
3 Best Epoxy For Toilet Tank Repair
If you are repairing a cracked or broken toilet tank, you need reliable epoxy glues to fix and heal the spot quickly and should last a long time. So which is the best epoxy for toilet tank repair? Well, here are the reviews of my top 3 picks, and you can decide the rest afterwards.
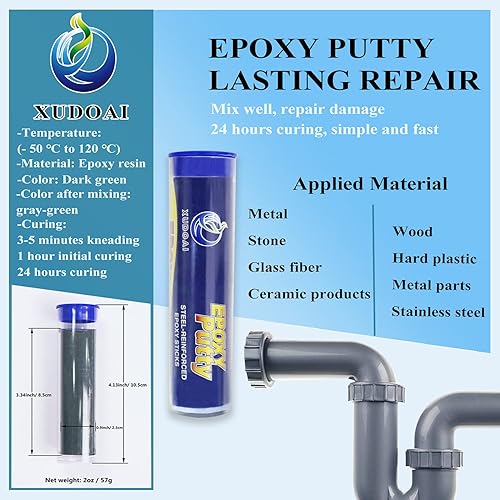
1. Best Value: Xudoai Moldable Epoxy Glue
The Xudoai Moldable Epoxy Glue is an easy-to-apply adhesive glue for those who are tired of mixing epoxy or using liquid types. This glue is strong, long-lasting, and can withstand water and heat.
Features And Benefits:
- Powerful Bonding Formula: We all know that all epoxy glues provide a strong bonding. But the Xudoai Moldable Epoxy Glue comes with a particular bonding formula that makes it suitable to apply on multiple surfaces, such as wood, glass, plastic, ceramic, concrete, etc.
- Ease Of Application: You can apply this epoxy without going through the trouble of mixing any resin and hardener. Just take out the mould from the tube, cut the required amount and knead it for a few minutes before applying it to cracks or broken areas.
- Drying And Cure Time: For cutting, kneading, and applying, you will get a maximum of 10 minutes. The glue usually begins to dry and cure after 10 minutes and will harden completely in 24 hours. Though the putty sticks to any surface after hardening, it may not blend with the surface colour unless you paint it.
- Safety: The Xudoai Moldable Epoxy Glue is safe, even for use to repair toys. The product instruction recommends wetting hands before kneading the glue to prevent it from sticking to hands. However, I recommend wearing gloves because the putty mould gets slightly heated due to a chemical reaction after mixing.
- Value: This glue comes at a very affordable price. And compared to its performance and reliability, the glue is worth the value. That is why it is the best value epoxy glue on today’s list.
Pros:
- Provides a powerful bonding
- Suitable to use on various surface types
- Comes at an affordable price
- Easy to mix and apple
- The putty does not go to waste and can be used up to a year
Cons:
- Putty colour does not blend with toilet tank colour unless painted
- Not suitable for fixing metals
Unlike most epoxy glues, the Xudoai Moldable Epoxy Glue is easier to use and remove, even if it sticks to your hand. However, if you want a quick glue solution, this glue is the best option for you.
2. Best Choice: J-B Weld 8277 WaterWeld Epoxy Putty Stick
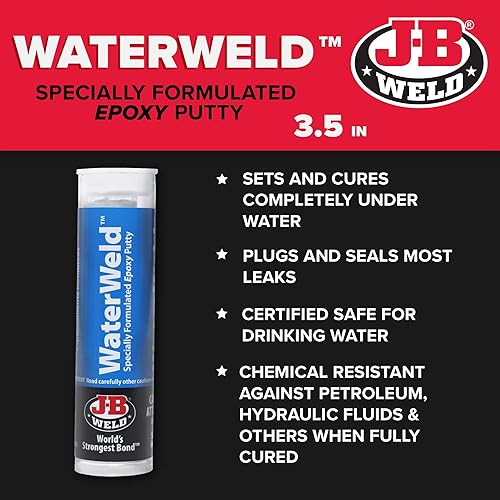
J-B Weld is already a recognizable brand name when it comes to reliable glues. And this particular glue is also easy to apply, reliable, and repairs almost anything pretty quickly.
Features And Benefits:
- Performance: The J-B Weld WaterWeld Epoxy Putty Stick is made with a special formula to make it suitable to provide the highest performance. This epoxy glue repairs various materials and damages them without much hassle. And it is also highly effective in repairing toilet tanks.
- Application Ease: This putty glue comes in a tube, and the user can apply this glue in four easy steps. Since it is a putty epoxy glue, all you have to do is knead the putty for a few minutes before applying and then wait for it to dry and harden.
- Drying And Cure Time: The epoxy dries in less than 25 minutes and cures in an hour. And once it dries, the epoxy leaves an off-white colour on the applied surface. Though it claims to cure in an hour, leaving the repaired area alone for at least 12 hours is best to ensure the epoxy has hardened well.
- Resistance: The J-B Weld WaterWeld Epoxy Putty Stick is made to work even underwater. That is why the glue has high water resistance and can withstand heat up to 350°F (177°C).
Pros:
- Reliable epoxy glue at a very low price
- Has a high resistance to heat and water
- Easy to mix and apply
- Suitable to use on multiple materials
- Cures faster than most glues
Cons:
- Dries into an off-white colour
- Does not work effectively on metal
One of the best things about the J-B Weld WaterWeld Epoxy Putty Stick is that knowing it is from a reliable company will provide satisfactory performance. And you get this convenient glue at a very low price, making it preferable to users.
3.PC-11 Epoxy Adhesive Paste
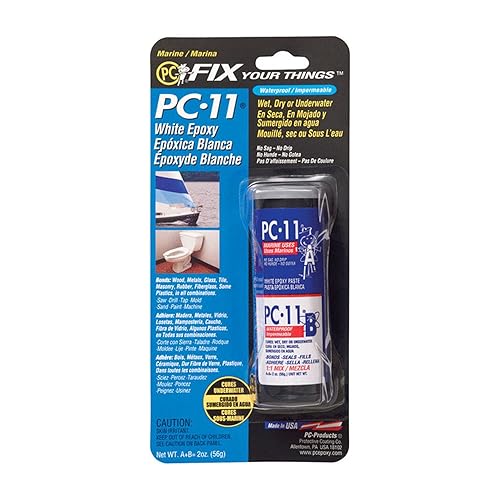
This epoxy adhesive from PC Products is yet another one of my best choices. Though the company offers various ranges and sizes of glues, I chose the 2 oz epoxy tube as it is easy to use and does the repairing job well.
Features And Benefits:
- Applicable Surface: From glass, fibreglass, and ceramic to plastic, this versatile glue works on any surface. It does not matter if you apply it indoors or outdoors, or whether wet, dry, or underwater surface, the PC epoxy glue will provide a convenient result.
- Drying And Curing Time: After applying the glue, it will take around half an hour to dry completely. I think the drying time is a bit longer since there are glues in the market that dry faster than this one. Moreover, it would help if you waited at least 15 to 24 hours for the glue to cure or harden.
- Resistance: This glue is resistant to water, works underwater, and has excellent resistance to high and low temperatures. It can tolerate any temperature as low as -20°F and as high as 200°F. With its 1710 PSI strength level, you do not have to worry about the glue wearing off anytime soon.
- Availability: As I mentioned at the beginning of this review, the PC epoxy glues come in a variety of ranges. Depending on how small or big the damage is, you can choose various sizes. Some of them even come with applicators for efficient use. I chose the 2 oz jar as I needed to fix a cracked toilet tank.
Pros:
- Convenient to use on various types of surfaces
- Comes in various sizes and with applicators
- Has a high resistance to water and heat
- Suitable for permanent bonding
- Stays put even on vertical surfaces
Cons:
- Takes longer to dry and cure
- The epoxy has a thicker consistency
The PC-11 Epoxy Adhesive Paste is not my favourite one here. Yet, this glue turned out to be one of the best epoxy glue for repairing toilet tanks you will find. So if you think the product’s quality matches your expectation, you should check it out.
Frequently Asked Questions About Toilet Tank Repair Glue
Q. Can you glue a broken toilet tank?
Toilet tanks are made of ceramic or porcelain because these materials are waterproof and last a long time. And glues are commonly used to fix broken toilet tanks. However, it is essential to check and know if the glue is strong, long-lasting, and suitable for the toilet tank material.
Q. What type of glues can be used on toilet tanks?
Several types of glues are available and suitable to use on toilet tanks. You will find three common types: epoxy, super glue, and polyurethane. All of them have different qualities, ingredients, and longevity. But the type of glue to be used on the tank should depend on the crack or damage.
Q. Can I use Gorilla Glue on the toilet tank?
Gorilla Glue is known to be one of the strongest glues in the world. This glue is also long-lasting and works effectively on various surfaces. However, it is not the best idea to use this glue to repair the toilet tank as it is not 100% waterproof.
Conclusion: What Is The Best Epoxy Glue For Toilet Tank Repair?
Leaving a cracked or broken toilet tank without repair is one of the worst things to do. Not only does the crack widen over time, the water leaking or flooding your toilet floor is not something you want to deal with every day. So the right thing to do is to find the best epoxy glue for toilet tank repair and fix the problem.
I found satisfying results from the glues I reviewed on various occasions. But if you want to make a final recommendation, I will recommend the following two.
If you want a reliable epoxy glue that will take effect quickly and is worth your money, you can rely on the Xudoai Moldable Epoxy Glue. On the other hand, if you want a strong epoxy at a low price, you can use the J-B Weld WaterWeld Epoxy Putty Stick.